A medical surgeon gained international recognition by sharing magnetic resonance imaging (MRI) footage that showed how a patient’s injected hyaluronic acid fillers developed and moved on their own over time. Thousands of viewers were shocked by the results and acknowledged that their implanted fillers had never dissolved.
Dermal fillers are defined by the American Board of Cosmetic Surgery as gel-like substances that are injected into the skin to improve facial features, smooth wrinkles and soften creases, and restore lost volume. According to the American Board of Cosmetic Surgery, dermal fillers are substances that resemble gel and are injected into the skin to enhance facial features, soften creases, smooth wrinkles, and replenish lost volume.

According to the board, more than a million men and women select this well-liked face rejuvenation procedure annually. Hyaluronic acid is a common injectable filler kind that is also the most temporary. Usually, hyaluronic acid fillings last six to eighteen months. Oculoplastic surgeon Dr. Kami Parsa gained notoriety after posting an MRI video online. On Friday, July 12, Dr. Kami Parsa, an oculoplastic surgeon from Beverly Hills, California, posted a video of an MRI of a patient on his TikTok profile.
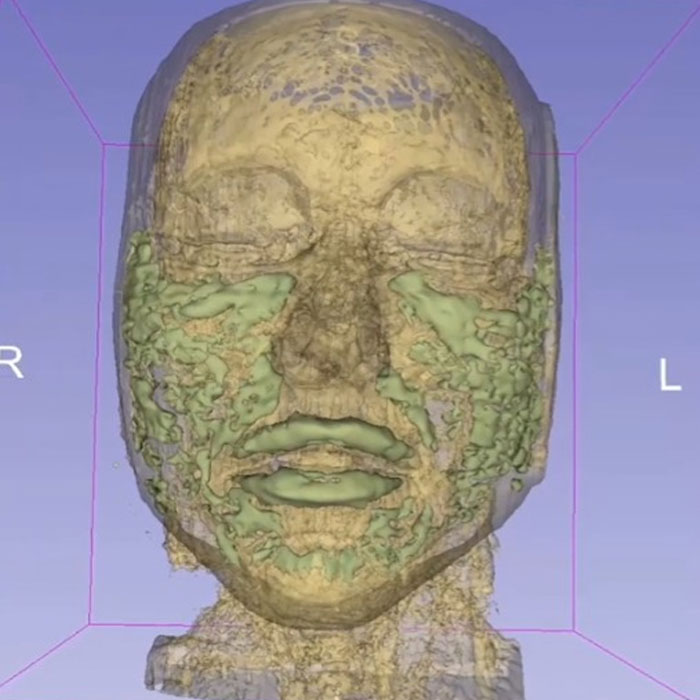
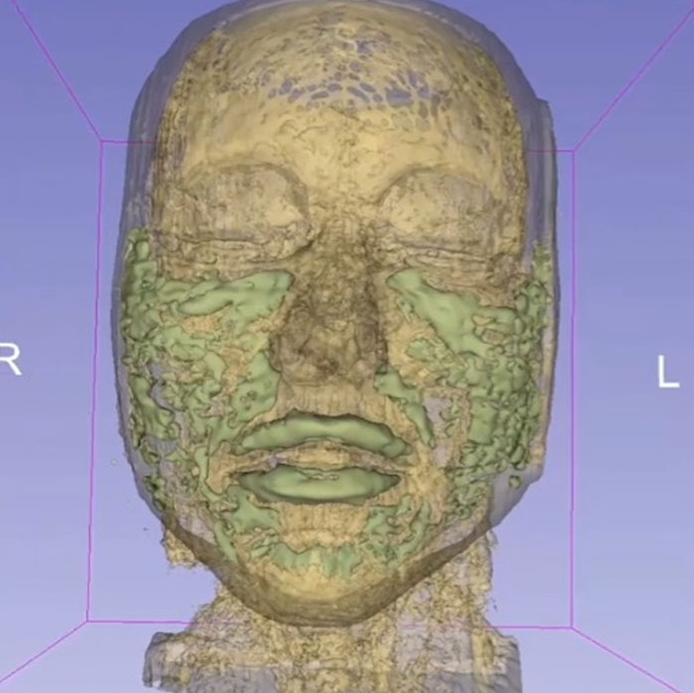
The movie demonstrated how the injections had changed the patient’s face. Over the preceding six years, the patient, a 33-year-old woman, had received more than 12 CC, or 12 milliliters, of hyaluronic acid filler injections. The movie’s MRI, which has received over 7.2 million views, showed a grey face with green dots lighting up in different spots, such as the cheeks and lips, to show where the remaining hyaluronic acid filler was.
The patient’s procedures were not disclosed by Dr. Parsa. He did, however, confirm that the material equaled 28 CC after doing a volumetric assessment to ascertain the woman’s filler amount. In the video, the physician said, “which is more than twice the amount of filler that was injected.” “This proves that hyaluronic acid fillers are hydrophilic,” he went on.
This indicates that they both enjoy being in water and stimulate tissue growth. An individual on TikTok expressed concern over the MRI, saying, “I just don’t see how this wouldn’t completely destroy the lymphatic system.” Someone wrote, “Finally, THIS IS BEING TALKED ABOUT.” “Mass production and impulsive, insane use.” I must find out more.How about botox? “Botox has a long history and is safe if performed correctly,” was the response from Dr. Parsa. The patient’s hyaluronic acid filler dosage has increased, as shown by the MRI.
Son Who Hadn’t Seen His Mother in Years Returns to Find Her Home in Ruins

Adam had not visited his mother for years, becoming distant after he started his own life. One day, he needed to pick up some documents from her house, only to find it in ruins and abandoned.
Diana Evans raised Adam alone, working tirelessly to provide for him and pay for his education. After he graduated from high school, he chose to attend a university far away in New York. Though it made her sad, Diana supported Adam’s decision to study and live in New York while she remained in California. In the beginning, they stayed in touch, and he called her whenever he had the chance.
Unfortunately, Diana never managed to visit Adam during his college years. Their communication mainly happened through phone calls, which gradually decreased over time, but she valued their conversations.
As graduation approached, Adam called his mother to invite her. Diana felt immense pride and excitement. She wanted nothing more than to see her son walk across the stage to receive his diploma.
After the call, Diana searched for flights to New York. To her surprise, the tickets were quite expensive, and she realized she didn’t have enough money for a round-trip ticket and a special gift for Adam’s graduation. Determined to make it work, she took on extra babysitting jobs to save up. After working long hours, she finally had enough money to buy her ticket and a gift.
While shopping, she decided on a nice watch, thinking every professional should have one. After making her purchase, she excitedly asked the sales clerk to wrap it beautifully, explaining that it was a gift for her son who was graduating from a top university.
A few days later, Diana flew to New York. Adam picked her up from the airport, and together they went to his campus for the graduation ceremony. Diana couldn’t contain her excitement as she snapped pictures. When Adam received his diploma, she cheered loudly, bursting with pride.
After the ceremony, they embraced warmly, sharing heartfelt congratulations. They went out to a nice restaurant for dinner, and even though Diana worried about the bill, Adam insisted on treating her, expressing his gratitude for all she had done for him.
Overcome with emotion, Diana felt grateful for the kind man Adam had become. She handed him the gift she had brought, and he was delighted to find the watch inside. He promised to wear it every day as a reminder of her support. That night, they enjoyed their time together, taking photos and exploring the sights of New York.
A few days later, Diana had to return to California. She felt lonely thinking about being back home without him. Adam assured her that he would try to visit, promising to keep in touch. Sadly, those calls became less frequent until they eventually stopped altogether. Diana began to feel lonely and depressed, struggling with her health and appetite. Despite her attempts to reach out, Adam was busy with work and his relationship, making only occasional calls to check in.
Eventually, Adam decided to establish his own firm in New York and needed some documents from California. Instead of asking his mother to send them, he flew back home unexpectedly. However, upon arriving, he was shocked by the state of the house.
The once vibrant home was now in disrepair, with cobwebs and broken fences. Inside, it was empty except for some ruined furniture. Adam tried calling his mother but received no answer, so he went to a neighbor for information.
The neighbor revealed that a recent storm had caused significant damage to their home. Diana hadn’t had the funds to repair it and had moved into a nursing home to avoid burdening Adam. Shocked and filled with guilt, Adam rushed to the nursing home. When he saw his mother, frail and in a wheelchair, he felt overwhelmed with regret for not being there for her when she needed him most.
Diana, relieved and touched to see her son, encouraged him to rise from the ground, but he remained there, expressing his sorrow for neglecting her. Adam promised never to let her be alone again, vowing to take care of her. This time, he kept his promise. He repaired their home and brought her back from the nursing home.
He chose to start his business in California instead of New York and invited his girlfriend to live with them. Together, they created a loving home where Diana felt cherished and happy once more. She helped around the house, cooking meals and keeping everything in order while Adam and his girlfriend worked.
The family found joy in their time together, reminding us that no matter how busy life gets, we should always prioritize our loved ones. A mother’s love is unwavering, and Diana’s hope for a reunion with Adam never faded, proving that love endures even in times of separation.


Leave a Reply